 2-1Using User Input2-1Using User Input
This lesson is all about getting input from the driver station — you can't make the robot move without it. So, we will not actually make the robot move until the next lesson.
Now that we are diving into specific functions, it is important that you understand how they are presented to you in this tutorial. Whenever you are first given a function, its format will be like this:
RETURN_TYPE ComponentClass::FunctionName(OPTION_TYPE options)
where:
RETURN_TYPE is the type of variable the function returns.ComponentClass is the class the function originates from.FunctionName is the actual name of the function.options are the specific options that each function takes.
OPTION_TYPE is the type of that option.What you see printed is NOT exactly what you type in. It is shown in this format for informative purposes.
There are really two different kinds of devices available for controlling the robot -- a game controller and a joystick. They have different programming interfaces. However, since we use the game controller, this tutorial will cover how to program for the game controller.
The HOT Team provides an advanced class for the game controller that removes the hassle of remembering button and axis indices.
For the moment, familiarize yourself with how the basic Joystick object works, and when you are ready to write your code for your robot this year, check it out!
If you recall from the last lesson, the game controller uses the Joystick class (the joystick does use this class, but it is programmed in a different way), and you need to provide the joystick ID in the constructor. For the purposes of this tutorial, let's say that you declared a pointer to a Joystick called m_gamepad at ID 0.
Buttons are the simplest to program. They use the following function:
bool Joystick::GetRawButton(int button_index)
where button_index is the numerical index of the desired button. For the XBox controller, this is the mapping:
WARNING: The left and right stick buttons are pressed when the actual joystick on the controller is pressed down. Because they are tied in with the controller, a driver can hit either button inadvertantly. Use these with extreme caution, if at all.
This function returns true if the requested button is currently being held down.
Note that the triggers are not here. They are treated as controller joysticks (you will see why in a moment).
The joysticks on the game controller are accessed differently than you might think at first. Each joystick device is accessed in terms of its axes, and not the joystick as a whole (doing that would cause too many headaches).
To access the value on any axis, use the following function:
float Joystick::GetRawAxis(int axis_index)
where axis_index is the numerical index of the desired axis. This is the mapping:
The joysticks, or axes 0, 1, 4, and 5, act a bit differently than you might expect. Let's look at axis 1, for example.
If you were to push the left joystick forward, using GetRawAxis() on axis 1 actually returns a negative value. Similarly, if you pulled it back, GetRawAxis returns a positive value.
Just like the vertical axes, the horizontal axes are also backwards. Using the GetRawAxis() on axis 0 would return a negative value if the joystick is pushed right, and a positive value if it is pushed left.
Another thing of note is that, when the joystick is pushed to its maximum extent, the GetRawAxis() function's return value for that axis will have an absolute value of 1. So, if you pushed axis 2 to its furthest extent forward, it would return a value of -1.
You may have noticed that the triggers of the game controller appear as axes 2 and 3. This is due to their capability of being able to tell exactly how far they are pressed down.
Unlike the other axes, the triggers do not ever return negative values, since unpressed is 0.
Generally, if you need to treat the triggers like a button, check if the axis is past a threshold of 0.4. However, if necessary, you can adjust this threshold to where the driver/operator is most comfortable.
It is also possible to access the controller's D-Pad, or as it is referred to by WPI sources, the POV hat.
The D-Pad is accessed differently than the buttons and the joysticks. Instead of querying the state of just one of the positions on the D-Pad, one function returns which way the D-Pad is currently pointing.
To access this value, use this function:
int Joystick::GetPOV()
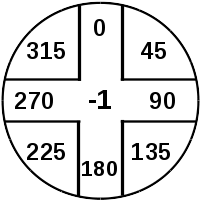
When the D-Pad is not pressed, this function returns -1. If the D-Pad is pressed, then the function returns the angle measured from the up
position.
Refer to the following diagram when using GetPOV():
One of the most important parts of programming in general is being able to do something that has a tangible result, even if it is a string of characters on a screen. To this point, you do not know how to make any visible result when you are programming the robot. For any programmer this is a problem.
In the past, teams used to be able to write messages on the driver station panel. However, this is no longer the case. Now, teams must output robot data to one of many dashboards. In this lesson, you will learn how to output to WPI's SmartDashboard.
Unlike all of the other components on the robot, you do not declare a SmartDashboard object in your code. Instead, you access each write function directly, using the scope operator (::)
Outputting data to SmartDasbhoard is different than outputting data to the terminal, like you're used to. When you write to SmartDashboard, you need to provide two things:
key) An identifier for the variablevalue) A numeric, boolean, or string variableAll of the writing functions for SmartDashboard take two parameters (listed above). Which function you use depends on the data type you're using.
Unlike all of the functions already discussed (and those that still have yet to be discussed), SmartDashboard functions are called exactly as they are presented in this tutorial (with the scope operator), like so:
SmartDashboard::PutString("My robot is","awesome");
As soon as you call these functions, the data is immediately written to SmartDashboard on the driver station, no manual updating required.
PutNumber()For all number-based data, use the PutNumber() function. It takes a double value, but any numerical data type you use can be typecast to a double.
void SmartDashboard::PutNumber(std::string key, double value)
PutBoolean()For true/false data, use the PutBoolean() function.
void SmartDashboard::PutBoolean(std::string key, bool value)
PutString()For strings, use the PutString() function. Because std::string derives from an array of chars (a C string), you can either pass a string literal
value parameter.
void SmartDashboard::PutString(std::string key, std::string value)
One of the unique things about SmartDashboard is that the person at the driver station can change the value directly in SmartDashboard using only the keyboard. However, you need to be able to fetch that new value in order to be able to do anything with it.
In order to do this, only one parameter is required:
key: The unique key for the value.The key should match to whatever you set that value to be initially in the code with the Put functions.
Like the Put functions, you call these using the scope operator, not by instantiating a SmartDashboard object.
GetNumber()double SmartDashboard::GetNumber(std::string key)
GetBoolean()bool SmartDashboard::GetBoolean(std::string key)
GetString()std::string SmartDashboard::GetString(std::string key)
This section just clarifies use of the functions we just discussed. If you feel confident, then you may skip this section.
If you're still a little confused, this section will help you understand the content better (hopefully).
If you remember from lesson 1-2, TeleopPeriodic() will loop until the robot shuts down or another mode is entered. So, you must remember that, for the cases of this program, what you write is constantly running in a loop.
Because it is already looping, you should write the TeleopPeriodic() function as if the whole thing were a loop. So, if you write something to the SmartDashboard in TeleopPeriodic(), it will write to SmartDashboard every time the CPU performs another loop.
Future note: that is actually good, because then you can write real-time values to SmartDashboard.
For example, let's look at a program that prints Hello World!
to the driver station when, and only when, the A button is pressed.
What we need:
Joystick object
#include "WPILib.h"

class Robot: public IterativeRobot
{
public:
	Joystick* m_xbox;

	Robot()
	{
		m_xbox = new Joystick(0);
	}

	//...
}
Now, we're ready to start programming the logic. This program will only use the TeleopPeriodic() routine, so leave the other routines blank.
//...

	void TeleopPeriodic()
	{
		/** The first thing we need to do
		  * is check for a button press.
		  * Because GetRawButton() returns
		  * a bool, we can simply put it
		  * in the if statement.
		  *
		  * Remember, button A is index
		  * 1.
		  */

		if (m_xbox->GetRawButton(1))
		{
			/** The user has pressed the
			  * button. Set "Hello World" on the
			  * dashboard to true.
			  */

			SmartDashboard::PutBoolean("Hello World",true);
		}
		else
		{
			/** The user has not pressed
			  * the button. Set the "Hellow World"
			  * on the dashboard to false.
			  */

			SmartDashboard::PutBoolean("Hello World",false);
		}
	}

//...
Now, we will write a program that prints a message to the driver station and tells if either trigger is pressed past a threshold of 0.4. Additionally, it will output the value of the left X axis.
What we need:
Joystick object
#include "WPILib.h"

class Robot: public IterativeRobot
{
public:
	Joystick* m_xbox;

	Robot()
	{
		m_xbox = new Joystick(0);
	}

	//...
}
Now, let's run through the program's logic.
//...

	void TeleopPeriodic ()
	{
		//Easy things first...print the value of the axis to the driver station
		SmartDashboard::PutNumber("Left X Axis",m_xbox->GetRawAxis(0);


		//Check to see if a trigger is being pressed beyond the threshold
		if (m_xbox->GetRawAxis(2) > 0.4 || m_xbox->GetRawAxis(3) > 0.4)
			SmartDashboard::PutBoolean("Trigger Pressed",true);
		else
			SmartDashboard::PutBoolean("Trigger Pressed",false);
	}

//...
To demonstrate how to use the D-Pad, we will write a program that prints the current state of the D-Pad, using a string that describes the D-Pad's state.
What we need:
Joystick object
#include "WPILib.h"

class Robot: public IterativeRobot
{
public:
	Joystick* m_xbox;

	Robot()
	{
		m_xbox = new Joystick (0);
	}

	//...
As for the program's logic, we need to get the current state of the POV and print a string based on that.
	//...

	void TeleopPeriodic ()
	{
		//we can use a switch/case since it's a value being returned by one function

		switch (m_xbox->GetPOV())
		{
		case -1:
			SmartDashboard::PutString("POV", "Not pressed");
			break;

		case 0:
			SmartDashboard::PutString("POV", "Up");
			break;

		case 45:
			SmartDashboard::PutString("POV", "Right, up");
			break;

		case 90:
			SmartDashboard::PutString("POV", "Right");
			break;

		case 135:
			SmartDashboard::PutString("POV", "Right, down");
			break;

		case 180:
			SmartDashboard::PutString("POV", "Down");
			break;

		case 225:
			SmartDashboard::PutString("POV", "Left, down");
			break;

		case 270:
			SmartDashboard::PutString("POV", "Left");
			break;

		case 315:
			SmartDashboard::PutString("POV", "Left, up");
			break;
		}
	}

	//...
};
Congratulations! You are now capable of making (the electronics on) the robot do something! Activities beyond this point will involve creating real robot programs. Again, one of the parts of programming is actually running the code to test its functionality.
This means actually downloading the code to the robot.
You may do so, provided that:
ENABLINGbefore you enable the robot -- loud enough for everyone to hear, but not too loud so that it is the last thing they hear. You should ALWAYS do this, regardless of the fact that your program might not do anything to actuate motors, but there is always a chance that something could go badly, so you need to take every precaution.
ENTERkey when the robot is enabled -- when pressed, this will stop the robot immediately.
As for actually downloading the code, this is how you do it:
Write a program that does the following:
float for this)
float with the left joystick and triggers as follows:
| ← Chapter 2 Overview | 2-1 Using User Input | 2-2 Controlling Motors → |