 1-3Parts of the Robot: In Code1-3Parts of the Robot: In Code
By this point, you have gone over 1) what parts of the robot are available, and 2) the structure of the program. Now, we will look at how we the parts of the robot are declared in the code.
Note that, if you are using RobotBuilder, all of this is done automatically.
One of the most important things that you will need to learn is how to write code — not in the terms of syntax, but rather of style. How you write your code really shows your skill as a programmer. If your coding style is atrocious, then no one (in some cases, not even you) will be able to understand your code. In terms of improvement, this is bad. If no one can help you fix bugs, etc., then you are essentially stuck.
One of the most important things that a programmer has is his/her peers. Quite often, beating out a bug can take multiple people, as the original programmer might not be able to see the bug. This is why it is so important that your code be legible.
In terms of general coding style for robotics, stick with a general C++ style. That is, keeping functions that take multiple statements on multiple lines, denoting different sections of your program with comments, and so on.
This is likely the most important piece of style. Every variable you declare does something (if it doesn't, get rid of it), but others need to know what it does in order for them to be able to help you with your program
(single-letter names for looping variables, such as x, y, z, or i are fine, but you will almost never use loops in robotics programming).
Thus, we follow a specific naming scheme:
TypeIdentifier m_DescriptiveLabel;
The m_ prefix stands for member
. It is a coding practice that has been in place for a long time (before FIRST came into existence), and while it isn't quite necessary, it is usually still included for clarity purposes.
Additionally, a f_ prefix can also be used for boolean flags.
The DescriptiveLabel part should be a descriptive label. You should be able to tell what the variable does without having to look at the code that it is used in. Do not use any irrelevant or confusing labels. For example:
GOOD
int m_TeleopLoopCounter;
From this declaration, I can already tell that you plan to use this variable to count CPU loops in the TeleopPeriodic routine.
BAD
int m_turtles;
The only conclusion I can draw from this declaration is that you are counting turtles. Such a feature would be useless on a competitive robot.
RobotBuilder Note: ONLY if you are using RobotBuilder, take off the m_ prefix. RobotBuilder tends to run into issues when the names get too complex.
How you declare your class members depends on what type the member is.
The most commonly used variables in robotics programming are ints, floats, doubles, and bools. Declare them like you normally would.
int m_TeleopLoopCounter;
When you are declaring actual robot components, use a pointer. This is generally to manage memory efficiently.
Each component is held as dynamic memory, so you need to create new instances of each component (this is how we call the class' constructor).
We will discuss exactly how to use the new keyword as we look at the individual components.
class Robot: public IterativeRobot
{
  public:
    Victor *m_lDrive;

    Robot()
    {
      m_lDrive = new Victor(0);
    }
};
RobotBuilder Note: If you are using RobotBuilder, this is done automatically. You should still know how to do this, however.
Only parts listed in the Programmed Components section of Lesson 1 can be declared as components in the program. Even then, the roboRIO, Pneumatic Control Module, and motors are not declared.
Note that you do not need to declare all of the parts on the robot for your code to work. Of course, you will only be able to control what is declared. Also note that the roboRIO cannot possibly detect the correct address (e.g. PWM or relay channel) of various components, so make sure that your assignment is correct.
Most parts are fairly straightforward. The tricky parts come in with the address assignment. Your electrical team should be able to tell you what is mounted where, but you should keep a wiring table and know how to find the relevant port, if necessary (see roboRIO).
Note that the location of each statement is not shown in the declaration example. The actual declaration belongs in the class list, and the initialization belongs in the class constructor.
NOTE: If you declare standard variables, such as ints or bools, you need to set a default value in the constructor, like so:
//..
	Robot()
	{
		//...

		m_myInt = 0;
		m_myBool = false;
	}
//...
RobotDriveThe class RobotDrive is not actually a part on the robot, but it is an abstraction object that handles the drivetrain motors. A drivetrain can either consist of 2 or 4 drive controllers.
It is possible to split the PWM output coming out of the roboRIO into two cables to double the signal, if two drive controllers should always be driven at the same speed and direction.
You will often find that this is done with the drivetrain controllers, since they are the most abundant. If your robot is wired like this, treat it like a 2-controller drivetrain.
In the initialization, provide all of the drive controllers that are part of the drivetrain. Provide the left controller(s) first, then the right controller(s). Ensure that you initialize the RobotDrive
AFTER you have initialized the individual drivetrain controllers.
For the four-motor configuration, the process is much the same, however there is an additional front-to-back differentiation. You still initialize left and then right, but for both sides you initialize the front first, and then the rear motor.
You should disable the safety (watchdog) unless you know how to use it. The watchdog is run by the drivetrain in order to detect errors. The watchdog is quite needy, as it needs to be fed data or it will disable the drive. If you are confident about what you're doing, you may keep the watchdog on, but for now, just disable it.
//RobotDrive declaration
RobotDrive *m_robotDrive;
/** You will see how to declare drive controllers momentarily
  * Let's assume we've declared two Talons, m_lDrive and m_rDrive
  */

//RobotDrive initialization
m_robotDrive = new RobotDrive (m_lDrive, m_rDrive);

// Now for the four-motor configuration with four Talons: m_lfDrive, m_lrDrive, m_rfDrive, m_rrDrive
m_robotDrive = new RobotDrive (m_lfDrive, m_lrDrive, m_rfDrive, m_rrDrive);

m_robotDrive->SetSafetyEnabled(false);
Alternatively, RobotDrive can also take the PWM channel number for each motor instead, if you do not plan to need to access the individual motors themselves in the code.
//RobotDrive with two motors
m_robotDrive = new RobotDrive (0,1);

//RobotDrive with four motors
m_robotDrive = new RobotDrive (0,1,2,3);
A Victor (which you have seen declared before) is of type Victor (with a capital V). It encompasses both Victor motor controllers and VEX motor controllers.
In the initialization, provide the PWM channel on the roboRIO that the controller is hooked up to.
//Victor declaration
Victor *m_motor1;

//Victor initialization on PWM channel 0
m_motor1 = new Victor (0);
A Jaguar is of type Jaguar (with a capital J). In the initialization, provide the PWM channel that the controller is hooked up to.
//Jaguar declaration
Jaguar *m_motor2;

//Jaguar initialization on PWM channel 1
m_motor2 = new Jaguar (1);
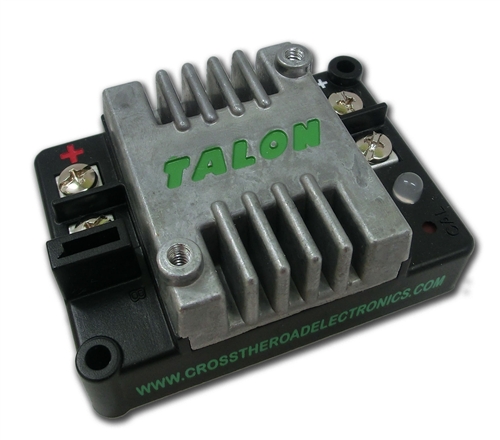
A Talon is of type Talon (with a capital T). In the initialization, provide the controller's PWM channel.
//Talon declaration
Talon *m_motor3;

//Talon initialization on PWM channel 2
m_motor3 = new Talon (2);
This category includes generic servos but not VEX motors (see Victors), as VEX motors are managed differently.
A servo is of type Servo (with a capital S). In the initialization, provide the servo's PWM channel.
//Servo declaration
Servo *m_servo1;

//Servo initialization on PWM channel 3
m_servo1 = new Servo (3);
Other than window motors, Spikes also drive generic lights on the robot (this does not include the notification light).
A Spike is of type Relay (with a capital R). In the initialization, provide the relay channel the Spike is connected to.
//Spike declaration
Relay *m_relay1;

//Spike initialization on relay 0
m_relay1 = new Riley (0);
In some cases, you have a controller/motor that is digital yet does not fall into this category. As long as it uses the digital output on the roboRIO, use this class.
A digital output is of type DigitalOutput (with a capital D and O, no space). In the initialization, provide the digital output channel on the Digital Sidecar.
//Digital Output declaration
DigitalOutput *m_do;

//Digital Output initialization on digital output 0
m_do = new DigitalOutput (0);
A compressor is of type Compressor (capital C). In initialization, provide the CAN ID of the pneumatic control module.
If the pneumatic control module's CAN ID is 0, then you may omit the CAN ID.
Note that, in this case, there are no parameters to pass to the Compressor object, so you would just leave out the parentheses entirely.
//Compressor declaration
Compressor *m_compressor;

//Compressor initialization with CAN ID 0
m_compressor = new Compressor;

//Compressor initialization with CAN ID 4
m_compressor = new Compressor (4);
This class is unnecessary to declare if you intend just to use the Pneumatic Control Module's automatic compressor handling.
A solenoid is of type Solenoid (capital S). In initialization, provide the solenoid channel from the pneumatic control module.
If the PCM that the solenoid is hooked up to is not assigned CAN ID 0, then provide the PCM's CAN ID before the solenoid channel.
//Solenoid declaration
Solenoid *m_sol;

//Solenoid initialization on port 2, with PCM ID 0
m_sol = new Solenoid (2);

//Solenoid initialization on port 0, with PCM ID 4
m_sol = new Solenoid (4, 0);
Some common sensors use a generic class for their type. Below, if a generic class is given, the sensors that use that class are provided in a list.
AnalogInputThe class AnalogInput (capital A,I; no space) manages generic analog devices. These devices manipulate voltage as output.
The most common device used in this category is a potentiometer. If you have a general analog device, use this class (unless otherwise specified).
In the initialization, provide the analog channel of the device.
//AnalogInput declaration
AnalogInput *m_analogDev;

//AnalogInput initialization on analog channel 0
m_analogDev = new AnalogInput (0);
The class DigitalInput (capital D, I; no space) manages generic digital sensors.
The most common device used in this category is a limit switch. Light sensors are also digital inputs. If you have a general digital device, use this class (unless otherwise specified).
In the initialization, provide the digital input channel on the roboRIO.
//DigitalInput declaration
DigitalInput *m_digitalDev;

//DigitalInput initialization on digital input 0
m_digitalDev = new DigitalInput (0);
An encoder is of type Encoder (capital E). In the initialization, do the following:
//Encoder declaration
Encoder *m_lEncode;

//Encoder initialization on digital inputs 1 and 2, reversed, using a distance of 1 per pulse and a max period of 1
m_lEncode = new Encoder (1,2,true);
m_lEncode->SetDistancePerPulse(1);
m_lEncode->SetMaxPeriod(1.0);
A gear tooth sensor is of type GearTooth (capital G, T). In the initialization, provide the digital input channel and whether you want to have the sensor keep track of the direction of rotation or not, using a true/false value.
//Gear Tooth sensor declaration
GearTooth *m_gt;

//Gear Tooth sensor initialization on digital input 3 with direction sensing
m_gt = new GearTooth (3);
m_gt->EnableDirectionSensing(true);
An ultrasonic sensor is of type Ultrasonic (capital U). In the initialization, provide the digital output channel of the sound emitter and the digital input of the echo detector.
//Ultrasonic sensor declaration
Ultrasonic *m_proximityDetect;

//Ultrasonic sensor initialization on digital output 5 and digital input 4
m_proximityDetect = new Ultrasonic (5,4);
A gyroscope is of class Gyro (capital G). In the initialization, provide the analog channel of the gyroscope, and set its sensitivity.
//Gyroscope declaration
Gyro *m_gyro;

//Gyroscope initialization on analog channel 1 with sensitivity of 2.00
m_gyro = new Gyro (1);
m_gyro->SetSensitivity(2.00);
There are many different kinds of gyros that are available to teams, and they generally use their own APIs. Refer to the source that you have for a particular gyro for how to initialize it (look at its constructor).
The roboRIO's built-in accelerometer is of type BuiltInAccelerometer (capital A). It has no special initialization.
//BuiltInAccelerometer declaration
BuiltInAccelerometer *m_accel;

//BuiltInAccelerometer initialization
m_accel = new BuiltInAccelerometer;
There are a few components on the driver's side that you need to declare.
Both a standard XBOX 360 controller and the Attack3-like joysticks are of type Joystick (capital J). In the initialization, provide the Joystick ID. Use the following rule:
The actual ID of the joystick depends on when it was plugged in (first plugged in - 0, second - 1, and so on). There are a total of 4 available slots. Some teams use 3 or 4 if they use Attack3-like joysticks (multiple joysticks per driver), but we only ever use 2.
//Game controller declaration
Joystick *m_driver;
Joystick *m_operator;

//Game controller initialization
m_driver = new Joystick (0);
m_operator = new Joystick (1);
Believe it or not, the driver station (computer) has a few components that need to be declared. These are either useful debugging tools or methods to access information about the field.
Note that, unlike everything above, you do not use the new keyword to initialize the object, because the object is already running on the driver station (and hence is not new).
Instead, each of these objects have a GetInstance() method that can be called to grab a pointer to the right instance. None of these objects have any parameters.
DriverStation ObjectThe DriverStation object (capital D, S) fetches different pieces of information regarding the field setup and the current match, such as:
To initialize it, just grab the pointer to the currently running DriverStation instance using the GetInstance() method.
//DriverStation declaration
DriverStation *m_ds;

//DriverStation initialization
m_ds = DriverStation::GetInstance();
Smart Dashboard provides an option to manipulate robot components in real time. This feature is known as Live Window mode, and is used in the Test routines in your program.
You manage Live Window with the LiveWindow object.
//Live Window declaration
LiveWindow *m_lw;

//Live Window initialization
m_lw = LiveWindow::GetInstance();
A Timer, is, well, a timer. This is useful for creating timed actions.
It is of type Timer. It has no special initialization.
//Timer declaration
Timer *m_timer;

//Timer initialization
m_timer = new Timer;

/** Notice how no parentheses were added after the 'Timer'
  * statement in the initialization. It's not necessary, so
  * just leave it out.
  */
In this activity, you will be given either the name of a component or a picture of a component. You will be given all of the necessary information to initialize the component. Using this information, write both a component declaration and initialization line.
There are 5 questions.
Talon* m_talon;m_talon = new Talon (3);| ← 1-2 Program Structure | 1-2 Parts of the Robot: In Code | Chapter 2: Driving and User Input → |