 1-1Parts of the Robot1-1Parts of the Robot
By now, you should be well versed in the ways of C++. While this is a lot to have learned, this still is not all. You can't just cout<<"Robot: Do this\n";
and expect the robot to do whatever it is you want.
Instead, this tutorial will teach you to use a different library, or set of functions that allow you to do various things.
You are already acquainted with these, as what you #include at the top of your source code are libraries. In this case, the library that you will be using is WPILib, which you would include as
#include "WPILib.h" (that will be discussed later).
What is more important right now is that you know what you are programming. If you don't, then you don't know how to program it. For the most part, what you really need to worry about is the electrical components of the robot; however, you should acquaint yourself with some of its mechanics so that you know what you want the electrical components to do.
This lesson will go over the various electrical components of the robot. Chances are that you already have gone over this, but it is still good to review.
All of the following components are not programmed, because their operation is usually set in stone.

The battery is the main source of power for the robot. FRC batteries provide 12V on average when adequately charged.

This is also fairly self-explanatory. This turns the whole robot on and off. The red button is the off button; there is a little black lever you push into the switch to turn the robot on. If you e-stop the robot, you need to cycle power on the robot using this.

The main breaker feeds directly into this panel. From here, power is divided (depending on voltage) to the various components of the robot.
Note that you don't always put a 5V device on a 5V terminal -- if the voltage from the battery dropped, the power for that device would also drop, causing it to stop working.
This orange light is actually programmed, but you will never see the code for this light. It is embedded in the roboRIO controller, which will be discussed next. This light changes its flash frequency to tell you whether the robot is connected to a driver station or not.
The following components are either programmed, affect your program in some way, or are affected by your program.

This is the brain of the robot. It communicates through the LAN port or through a connected USB wifi dongle. Your code is stored here.
When you replace it, you need to reboot this (either using the main breaker or the Reboot roboRIO...
button on the driver station) in order for your changes to take effect.
Unlike previous years, all of the inputs and outputs are located directly on the roboRIO. The following is a list of all of the ports that you might end up dealing with.
PWM
DIO
RELAY
ANALOG IN
CAN
SPI
I2C
RS-232
This year, the roboRIO comes with a built-in accelerometer.

This year, the solenoid breakout is being replaced with the small pneumatic control module.
This device controls solenoids -- which, in this context, are the valves that control pneumatics on the robot -- through a CAN bus. However, it is not necessary to program the CAN bus to use this.
The pneumatic control module is also responsible for controlling the compressor.
The following components are devices that are used to control other devices on the robot (hence the name). The devices that are controlled by controllers (e.g. motors) operate based on analog signals (most commonly voltage), so controllers are needed to smarten
these devices and provide more control over them.
In the code, as you will learn later, you program these as if they are the device they are operating. You do not actually program the devices the controllers control.

Victors are one kind of drive controller. They run off of a PWM output on the roboRIO, and they translate the PWM signal into a voltage.
Victors provide a significant amount of strength, and are a good choice for drive motors.

Jaguars are also drive controllers, and they too run off of a PWM channel on the roboRIO. In terms of programming, they are essentially the same as Victors. They do provide different features from Victors; however, despite their size, they can freak out when they encounter too much stress.
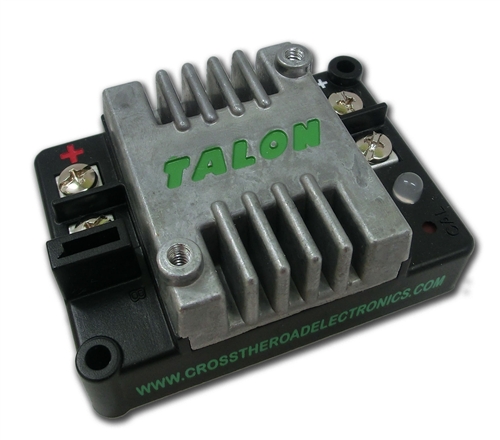
Talons are the newest type of drive controller. They combine some of the features of Jaguars and the robustness of Victors.
These, as well, run off of PWM channels and are programatically similar to the other two.

Spikes, controllers that run off of relays on the roboRIO, have three states: Off, Forward, and Reverse (the latter two being the device's On
state). They do not provide voltage control, so these are usually used on motors which do not require speed control (like window motors) or lights. The Reverse state is like taking a battery out and inserting it the other way, reversing the polarity. This is useful for driving motors in different directions.
All motors are hooked up to a controller, else they would be running constantly and in one state. You do not actually program the motors, but what you program the controller to do affects the motor.
Most motors are very similar. The only reason that specific motors are used is for different output ranges, torque, etc., properties that you, as programmers, are not particularly concerned with.
Of course, motors are not limited to this list. However, these are the kinds of motors you will see most commonly.

CIMs are powerful motors that don't give out easily. You will see these motors driving the drivetrain, but in some cases they power other things as well (in the case of the 2013 robot, they drove the climbing mechanism as well).
CIMs can come in different sizes (which provide different physical properties); the most common are the CIM and the miniCIM.


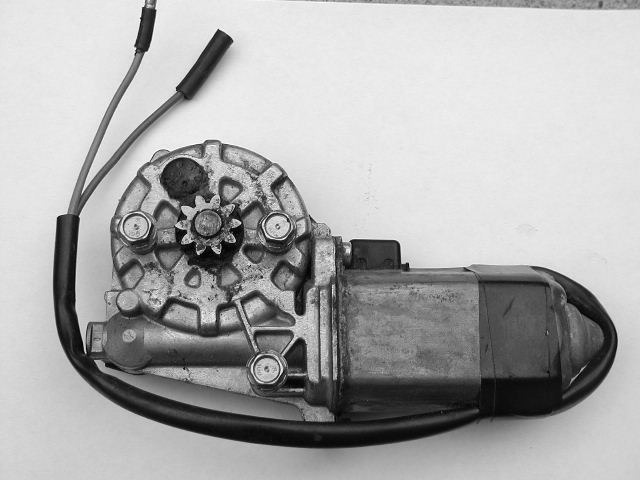
Believe it or not, but this is the actual motor that drives the power windows in your car.
Window motors are different from most other motors in that they run off of a relay (meaning they have the off, forward, and reverse states). You will usually see these running low-strain operations which do not require speed control.

Servos are special types of motors. They read directly off of a PWM cable. Doing so permits them to be controlled without a motor controller.
The width of the pulse provided in the PWM determines the endpoint of the motion of the servo.
Servos also have a builtin sensor that determines the rotational angle of the output. This allows you to control the position of whatever is attached to the servo without a PID (in theory).
Servos can have various rotational ranges, from a half-turn to multiple turns.

Vex motors are very similar to a servo motor (and some are servo motors), but they are not all servos, despite their similar appearance. These have specialized drive controllers, which are treated like Victors in the code.
Motors are not the only way to actuate parts of the robot. It is also possible to use a pneumatics system to change the position of various robot components.
Pneumatics are usually used to control parts of the robot that are not designed to maintain continuous motion. Usually, they control devices that have two different states.
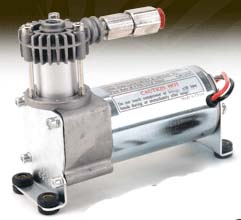
At the heart of the pneumatics system lies the compressor. This device charges the pneumatics system so that it can do useful work.
In the past, teams had to write code to control the compressor, turning it on when the pressure was too low, and turning it off when the pressure was reaching its safety limit. Now, the new control system does this automatically, but it is still possible to control the compressor from the code.

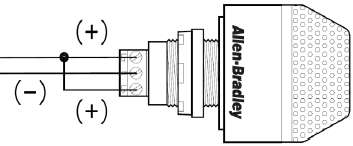
The solenoid valve is the component that controls the components that actuate the robot (usually a piston). In a sense, solenoids are to pneumatics as motor controllers are to electrical propulsion.
However, unlike most motor controllers, solenoids are two-state devices: open or closed. There is no fine control over the positioning of pneumatically actuated components.
Sensors are crucial parts to the robot. They provide important information pertaining to the robot's (or a part of the robot's) position. Note that what is listed here is not an exclusive list of what can be used on the robot.
The following sensors are attached to the Digital I/O on the roboRIO, and provide their data digitally.

Encoders are sensors that are used to measure distance. This distance can either be linear or rotational. You will see these most commonly on the drivetrain, measuring the distance the whole robot has traveled. They are usually used in autonomous.
Encoders work by emitting pulses every time a predefined distance has passed after the previous pulse. If you don't want to use the intervals that are hard-wired into the encoders, there is a software function that allows you to change this (we still usually just use the pulses as the distance). However, that will be discussed later.
Encoders always count up (unless driven backwards, then they count down), making them comparable to the odometer of a car.

It may be hard to believe, but this sensor watches (with a magnet) a gear and counts the number of teeth that pass by in a given period of time.

These digital devices are simple, in that they have two states: on and off (pressed and not pressed).

This device is basically sonar. It sends out a super-high-pitched sound and waits for the echo to determine the distance to an object.
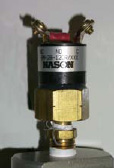
This device is a simple mechanism that watches the pressure in the pneumatics system. If the pressure reaches a certain threshold (usually at about 115 psi), the switch will close. The switch will remain closed until the pressure becomes low enough to open it again.
The following sensors can all be found plugged into the analog ports on the roboRIO. They provide their data by varying voltage.

Potentiometers are sensors that measure rotation. You may not realize it, but a lot of the electronics you interact with on a day-to-day basis use potentiometers. For example, the volume knob on your car stereo works because there is a potentiometer behind the knob.
The range of a potentiometer's output is technically from 0-6 volts, but may actually be around 1-5.

The number of turns a potentiometer will allow varies depending on the potentiometer. Some allow 3, some allow 10, some even allow less than a full turn (potentiometers are not limited to these). Because most of the potentiometers you will interact with have the same voltage range, potentiometers that have a lower number of turns are more sensitive, therefore they will be more precise.

Gyroscopes are sensors that determine rotation about all three axes: essentially, it determines the robot's rotation compared to the ground. It can also measure lateral direction (y rotation).
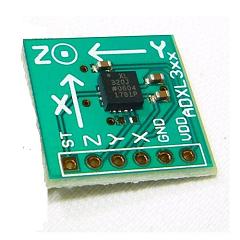
Accelerometers are sensors that measure acceleration along all three axes. This can be used to determine a part's orientation to the ground.
Since the 2015 controls system upgrade, the roboRIO has had a built-in accelerometer.

A camera's video feed can be used for various purposes -- in recent years, teams have used them to create an auto-alignment feature. They can also simply be put on the dashboard, so that the drivers can align the robot themselves. Of course, their use is not limited to that -- for example, it can be put near the bottom front of the robot so the drivers can see objects stuck in tight spaces or something small in front of the robot.
This year, the new roboRIO has added a set of USB ports, allowing teams to hook a webcam directly to the roboRIO for image processing.
Not to be confused with motor controllers.
These devices are what control the robot from the driver station.
Commonly referred to as a driver station if it is sending user input to the robot

In the case of robotics, computers have two uses: to write and deploy the robot's code, and to send driver input to the robot for processing.

The radio is the device that handles all of the robot's incoming and outgoing data. It is similar to a router, but it has other functions, as well.
During competitions, it acts less like a router and more like a client device (for example, a laptop on your home wifi), which connects to the field management system (aka FMS), which handles all of the data for every competing team, and sends it to the proper place.

XBOX 360 controllers are one of the two types of controllers that teams use (the other being the joystick).
In this case, each button runs a certain function (determined by you!), either started by a button press or only while a button is being held. The joysticks on the controller are used to drive the robot (for us, left Y axis and right X axis, to allow precision driving), and to perform manual operations.
Not to be confused with game controller joysticks
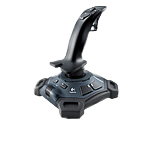
This is just a different input device. We do not use these, but you may see other teams using them.
Of course, the amount of components is not limited to this. There are even entirely different control systems (like an Arduino or a CAN bus). This is just a list of simple components that run on a simple control system (which we use).
The following activity will test your knowledge of the robot components.
The activity consists of 10 pictures. Your task is to do the following for each picture:
For example, given the following image:

When you click Start
, the information on the page will disappear. You will be presented with one image at a time.
When you are done, submit your answers. When you do, the first two parts will be checked automatically, and an example answer will be given for the last part.
| ← Chapter 1 Overview | 1-1 Parts of the Robot | 1-2 Program Structure → |